One Day At A Time
  • One Day at a Time
  • Portfolio
  • Graduate Work Portfolio
  • TechReadyPD

Data-Driven Interventions in the Music Classroom Part 4: Slow Cook'n a Data-Driven Iron Chef

9/10/2018

1 Comment

 
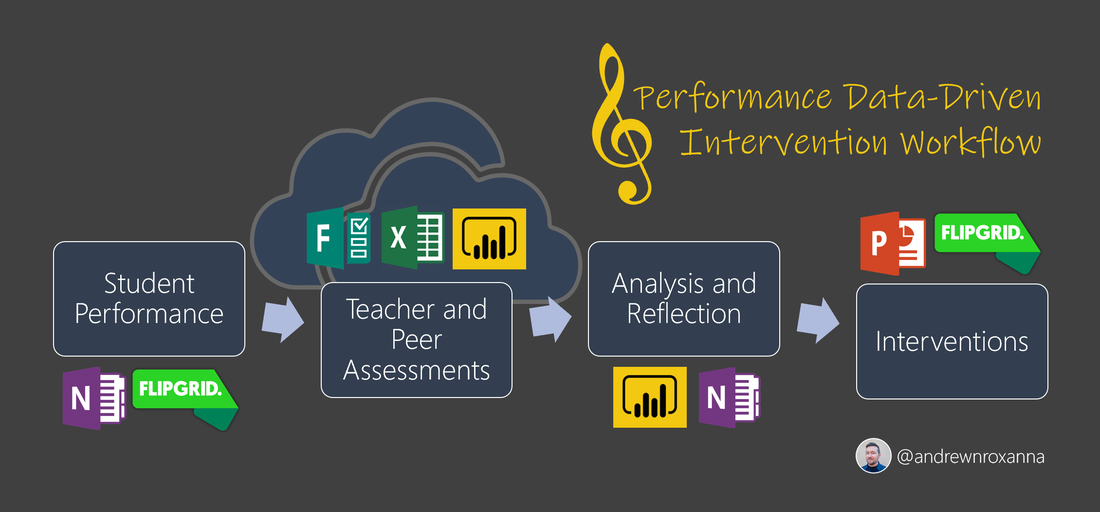
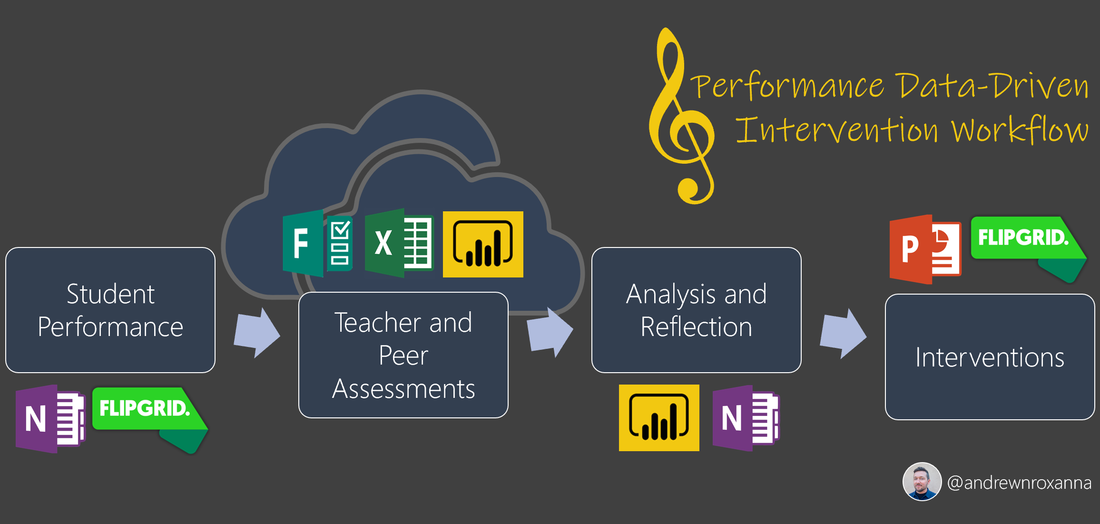
This is part 4 of a series of posts I'm writing on my past school year using various edtech tools for data-driven interventions.
Picture
I first learned about the Iron Chef activity from Jon Corippo. You put kids together in a group, give them a topic to research, and then give them twenty minutes to throw together a slide deck before they get up and present. It's a fun activity, but my students and I weren't ready to do this whole process in one or two class periods. This whole time I was slow cook'n the process, getting them ready for their collaborate group project.​
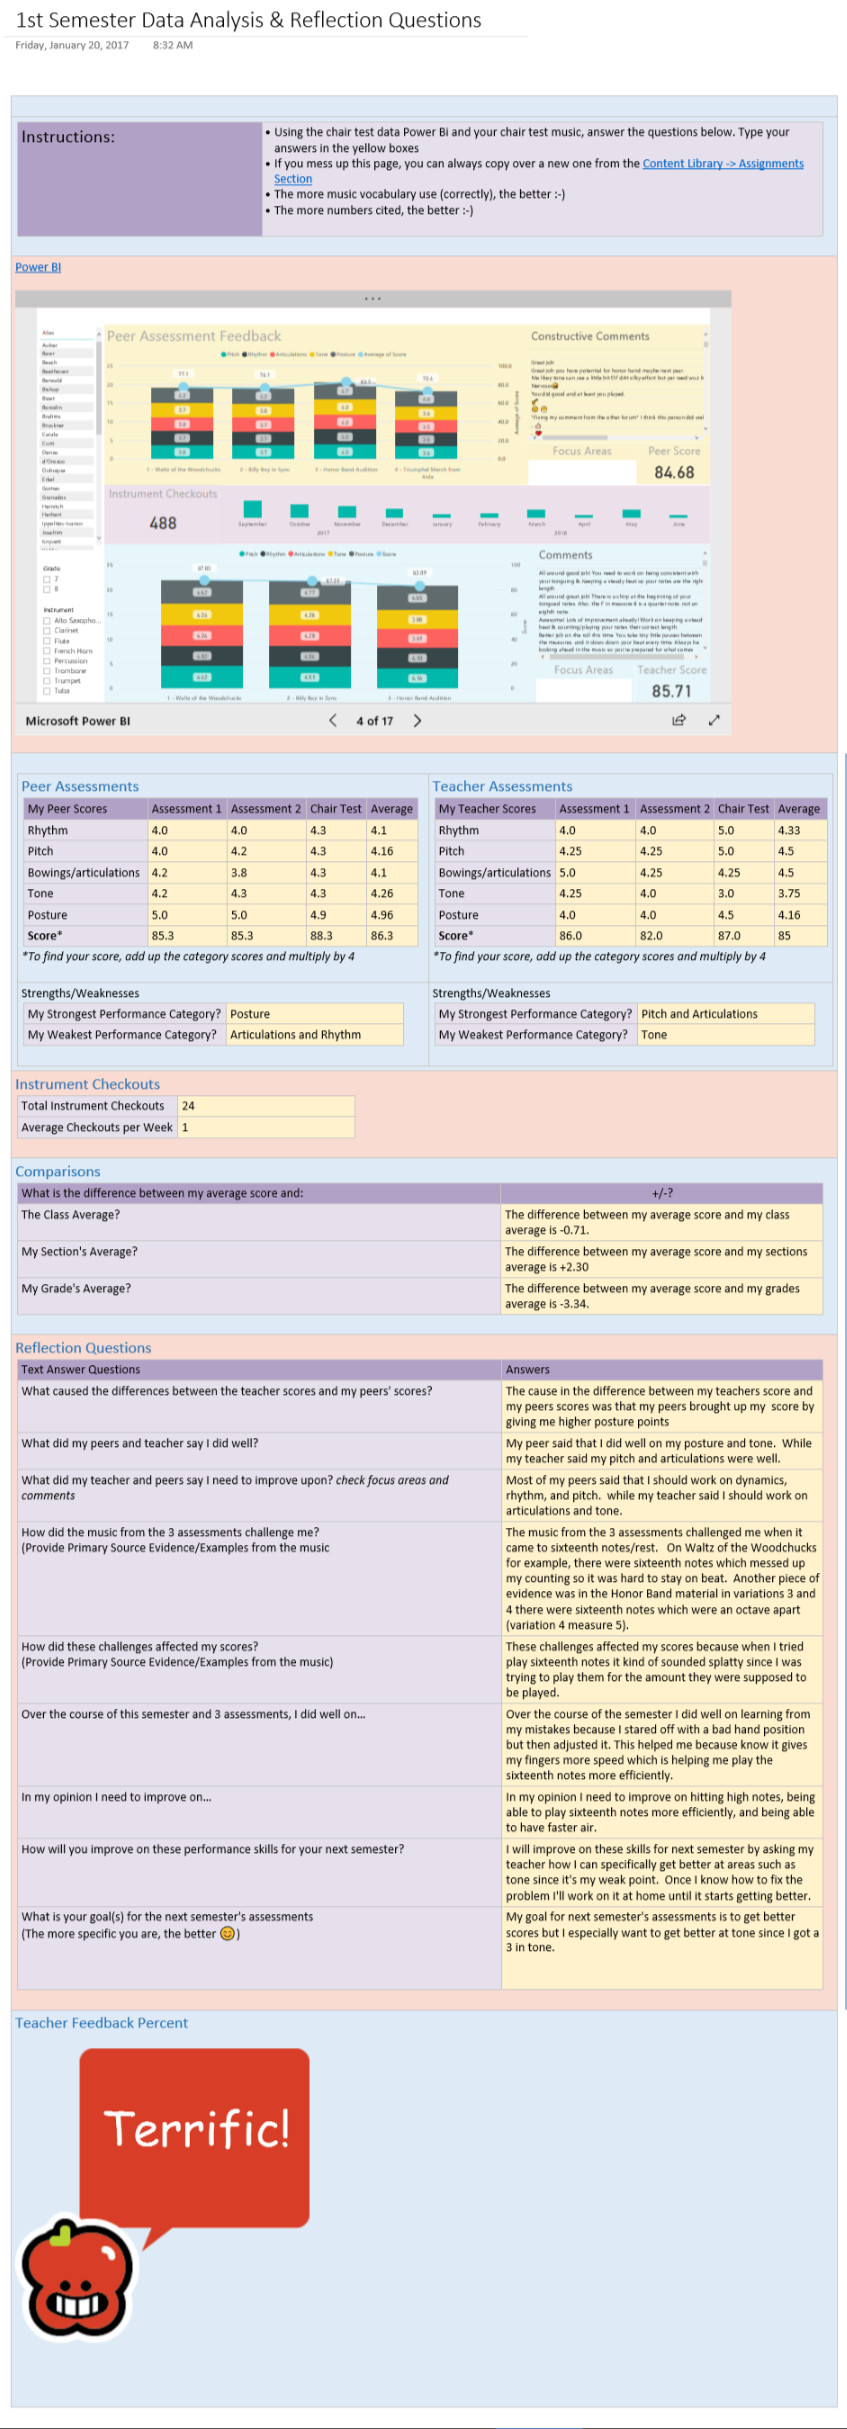
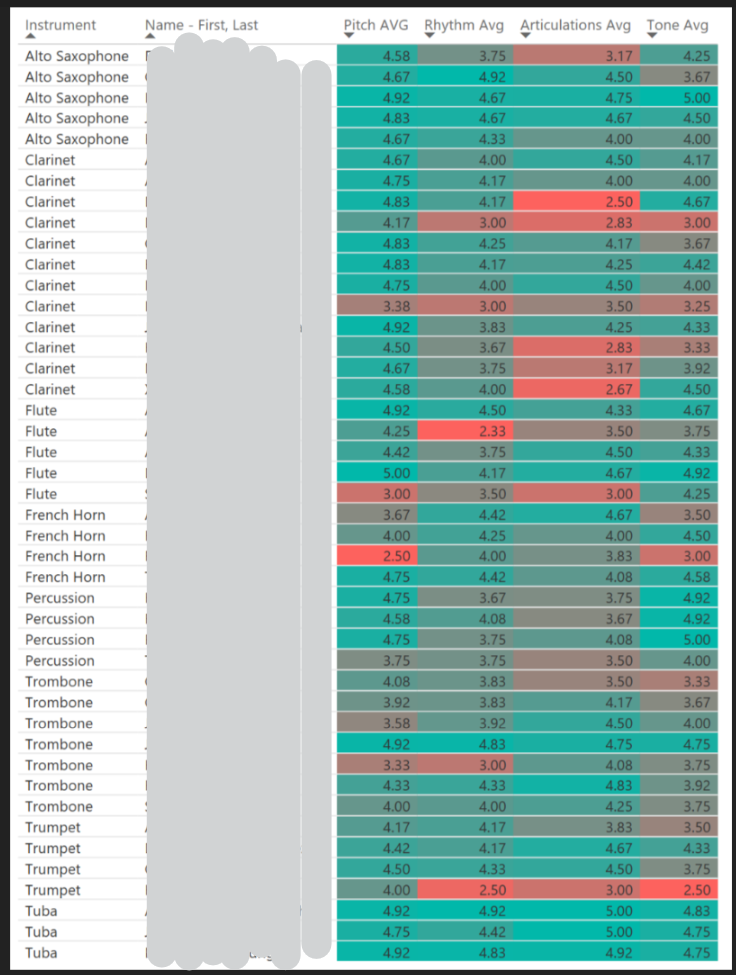
At this point I had placed my students into groups based on their neediest/lowest performance category (Pitch, Rhythm, Articulations, and Tone). Their next assignment was to collaboratively work together to put together a PowerPoint slide deck that generally focused on:
  • Their instrument(s)
  • Their performance technique category, such as:
    • How do you achieve this technique on your particular instrument?
    • Common mistakes
    • Good habits​
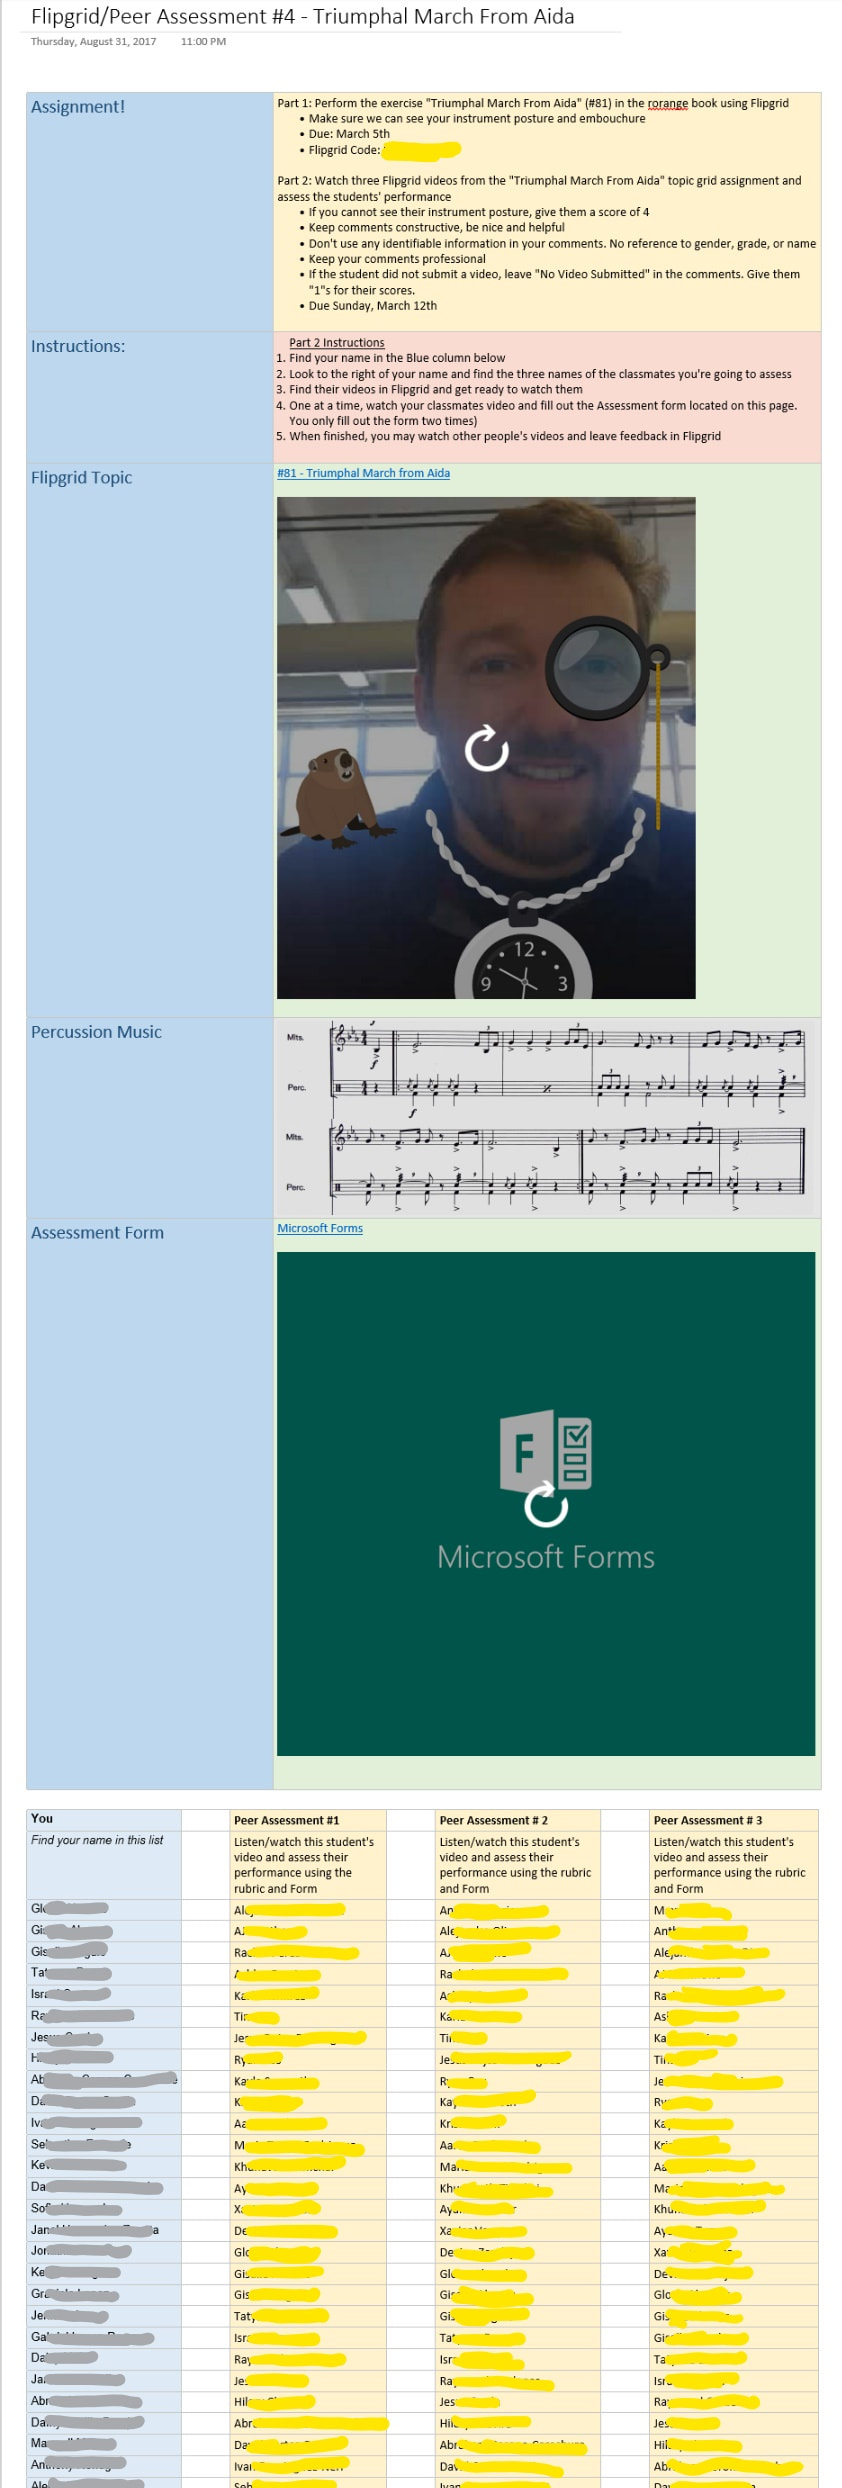
​Assignment details were located and distributed through OneNote, however this time I created a specific collaboration section for each group in the Collaboration Space of the Class Notebook and distributed each specific group page there. That way the groups had access and could collaborate together on their assignment page, but couldn't mess around with any other groups.
Picture
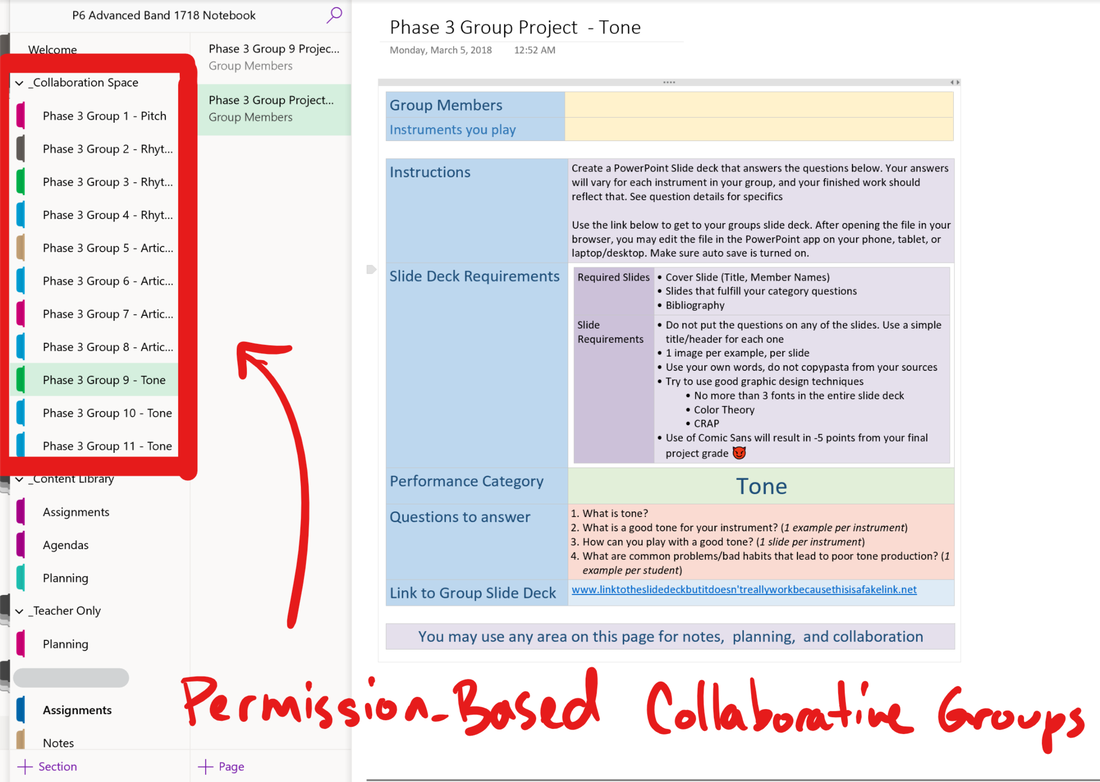
​Regarding the slide deck file, normally in an Iron Chef activity one kid in the group creates the file and then shares it to their colleagues and the teacher, but I didn't want to do this. My students didn't have enough practice with that particular skill and I wanted to avoid any hiccups related to it. In a perfect world/classroom I would have been able to create this assignment in Microsoft Teams, attach the PowerPoint template file I had created for each category group, and assign it to the group members thereby taking care of all the cloud/file permission stuff. Alas, my district still hasn't turned on Teams for the students yet ☹, so I took the matter into my own hands. In my OneDrive I created a folder for the project slide decks and created a template PowerPoint file. Basically I just put some directions on the first slide. I then just copypasta'd the file until I had enough for each group, and changed the title of each file to reflect Group 1, Group 2, etc. I then created a sharing link with editing rights for each file and copypasta'd that onto the corresponding OneNote group assignment page. This way my students could click on the link to get to the PowerPoint file in the browser, then click on the "Open in PowerPoint" button to open up the file in the iPad PowerPoint app.
Picture
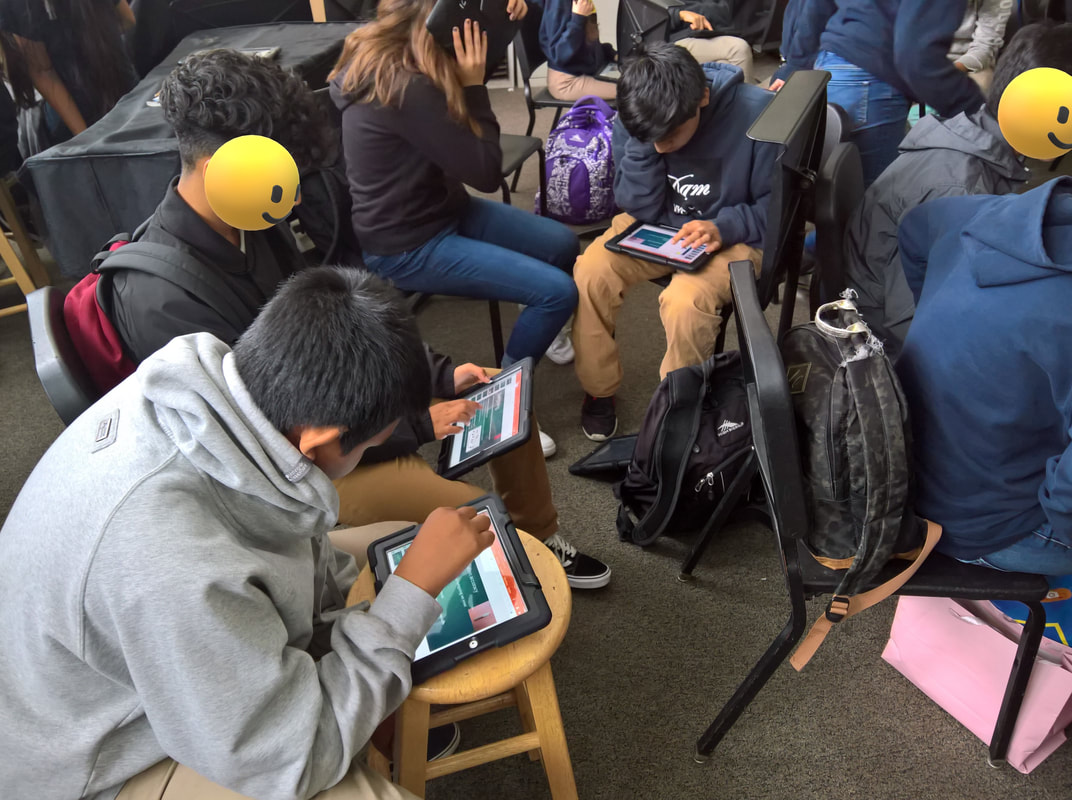
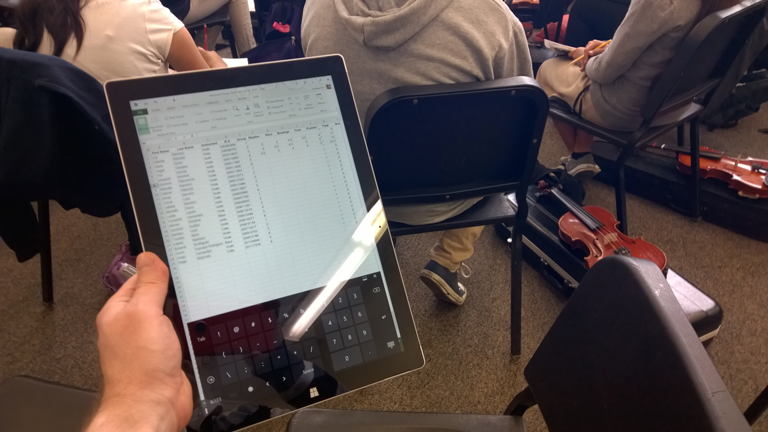
Collaborating in PowerPoint on iPads
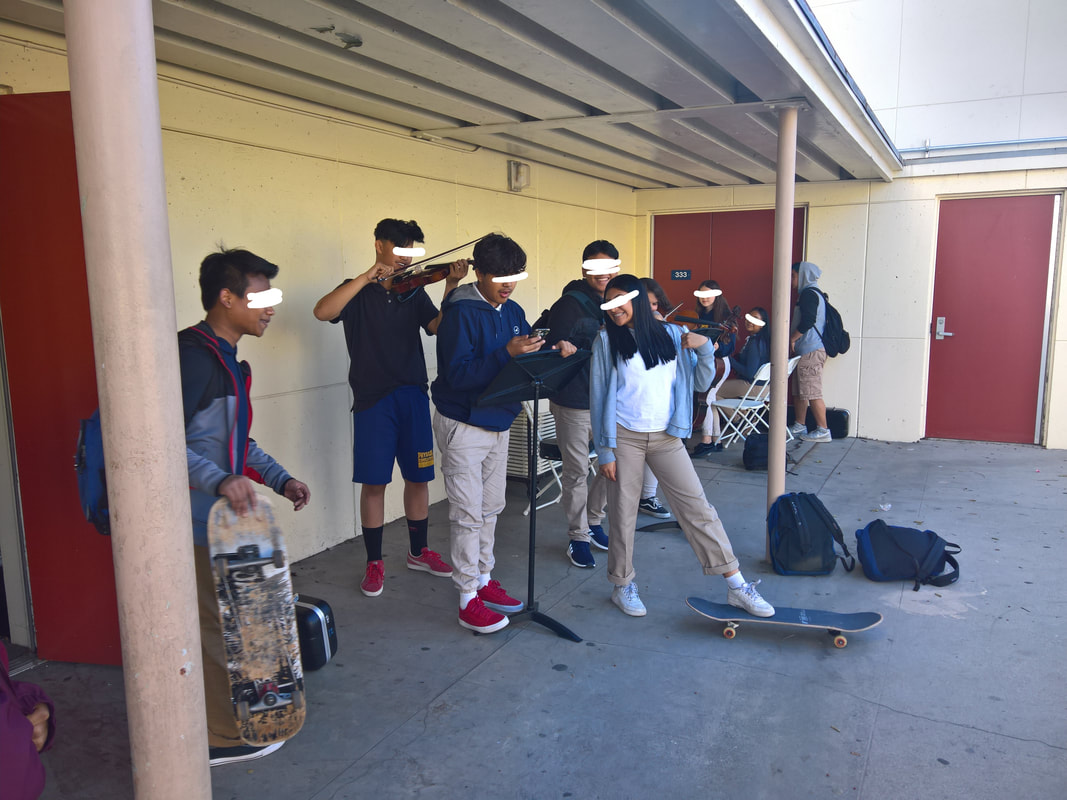
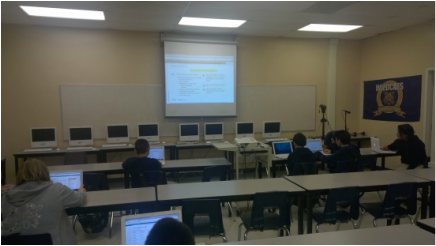
After that my differentiated collaborative group project was ready to go. For this project I gave them a couple weeks to get it done, and I gave them more class time to sit in their groups and work together. A few students were already behind on their previous assignments, and quickly realized how much they immediately needed to catch up. I also experienced seeing some previously-unknown leadership skills being used by students that usually are content sitting in the back of their instrument section and playing just enough to get by. That was cool.
Picture
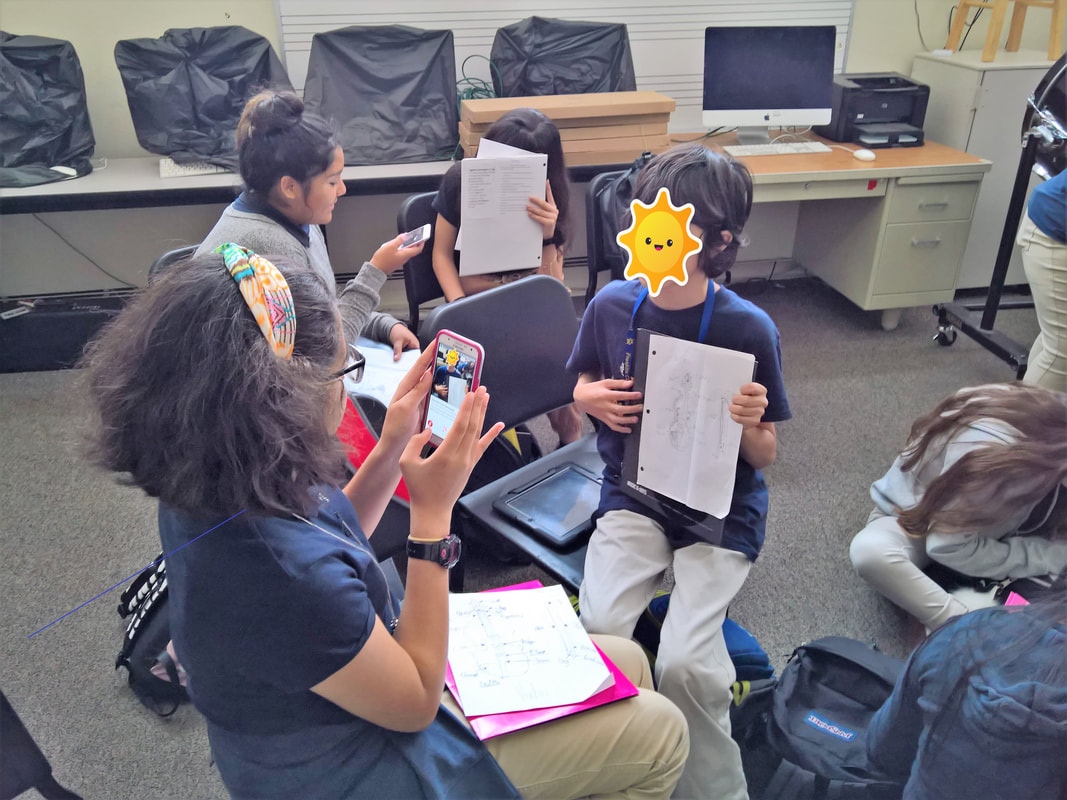
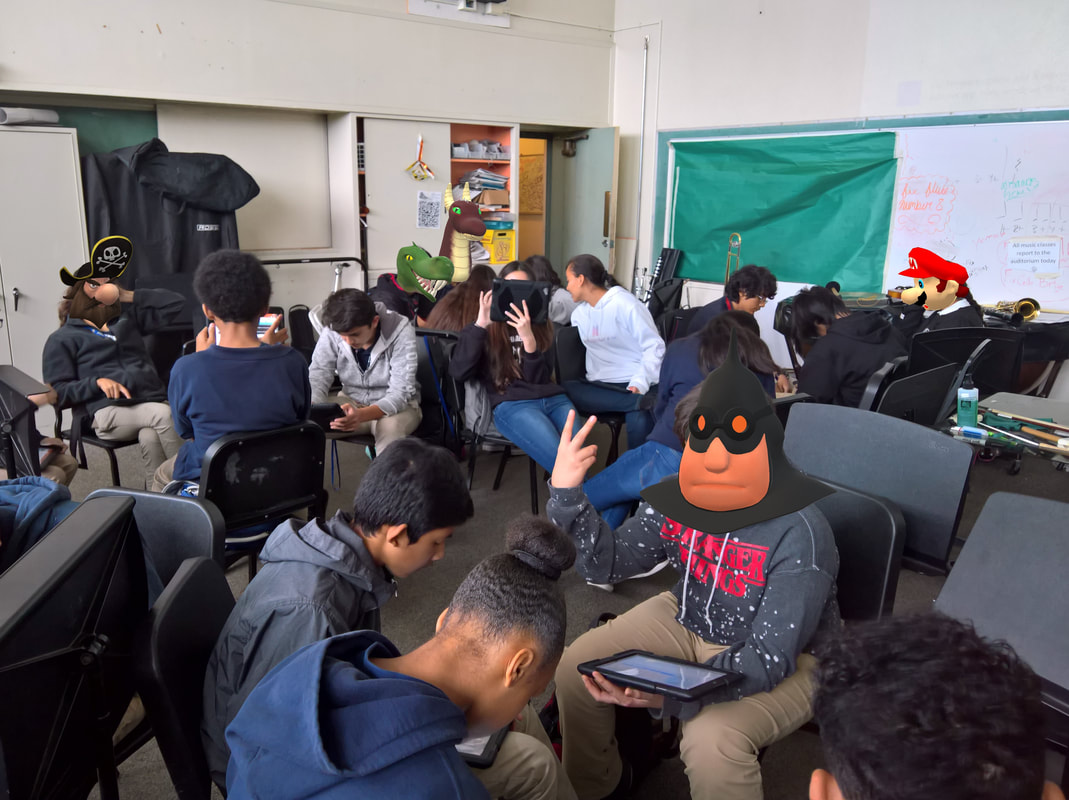
Working in groups. Can you tell I'm enjoying the Paint 3D app?
​

Picture
Feedback
 
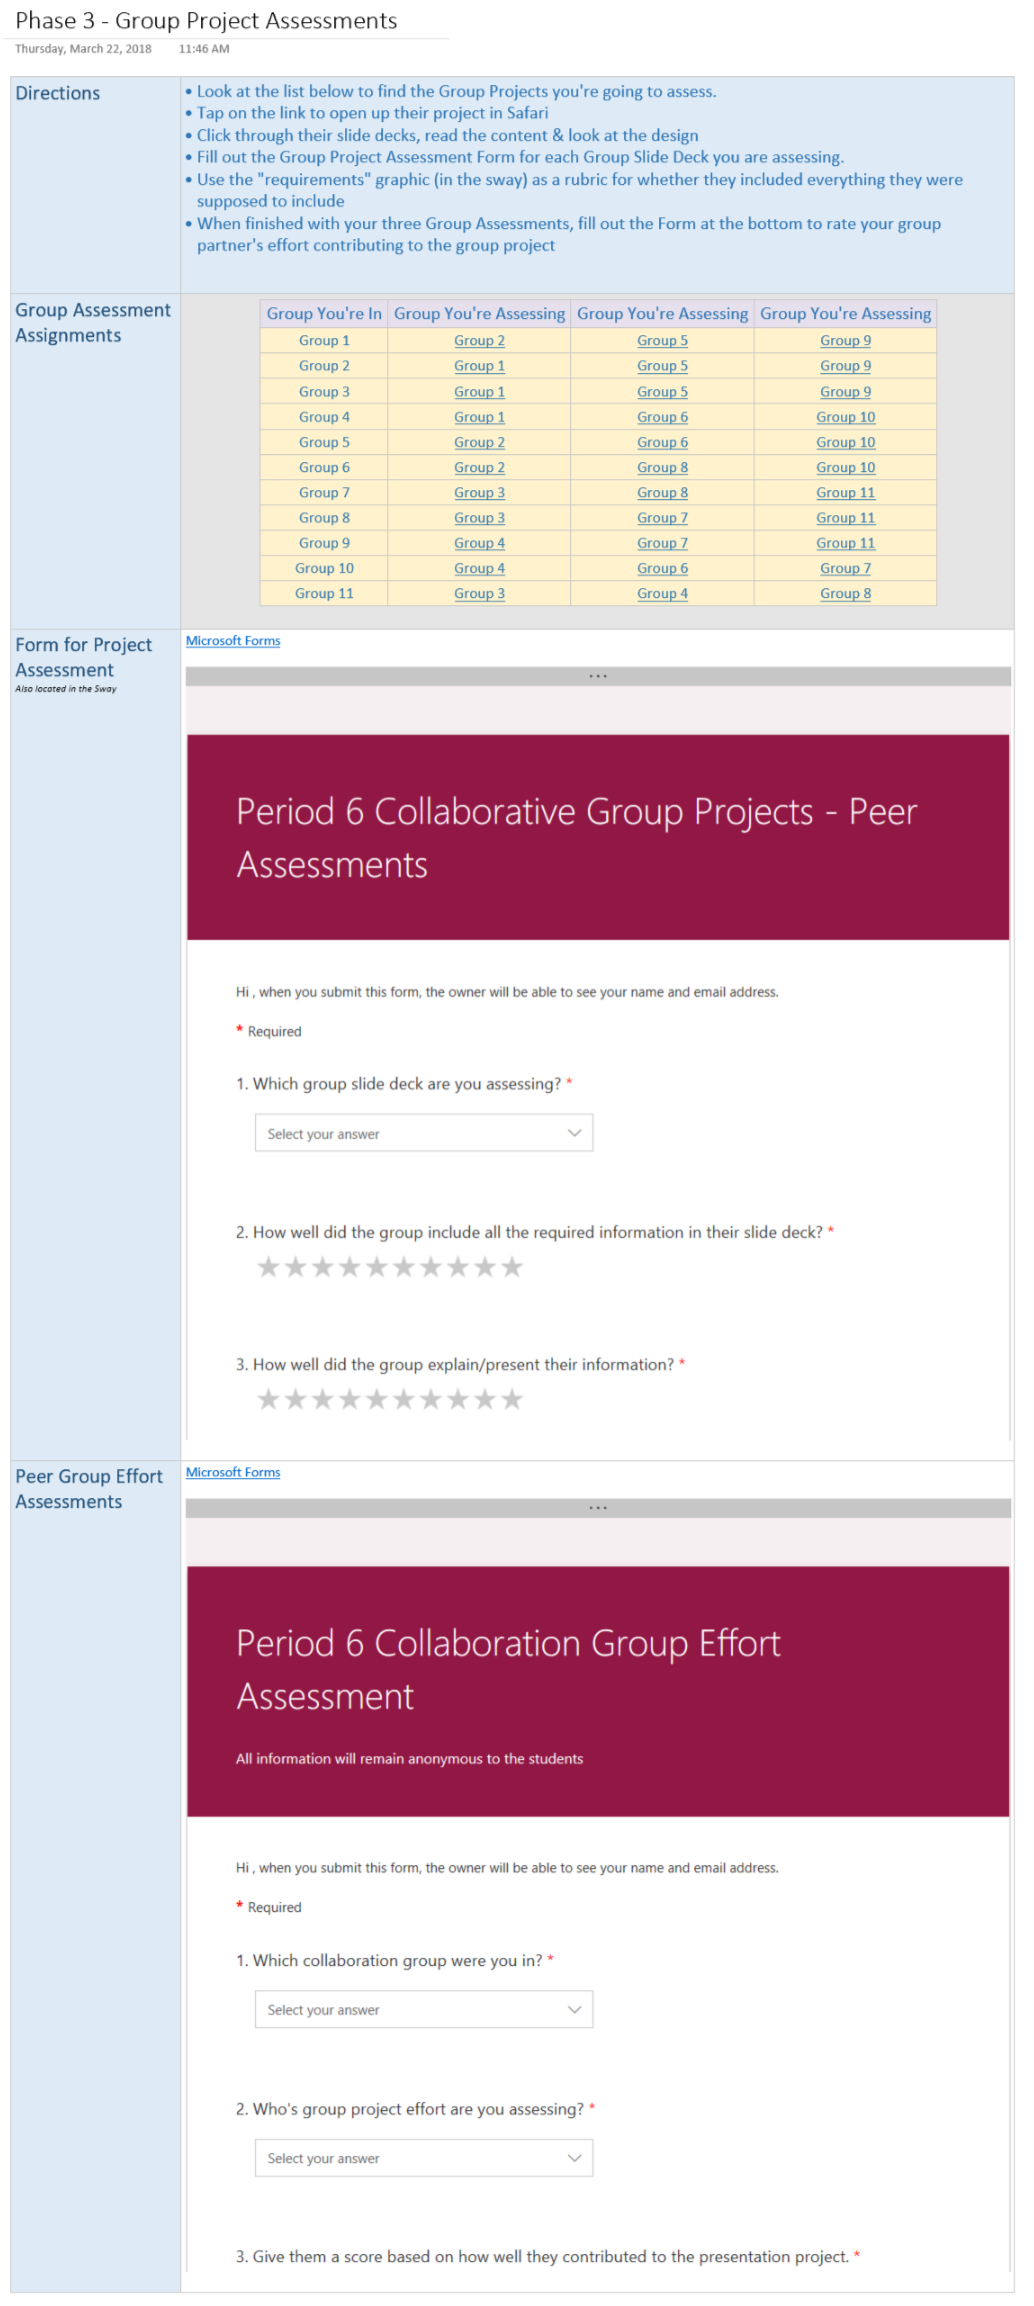
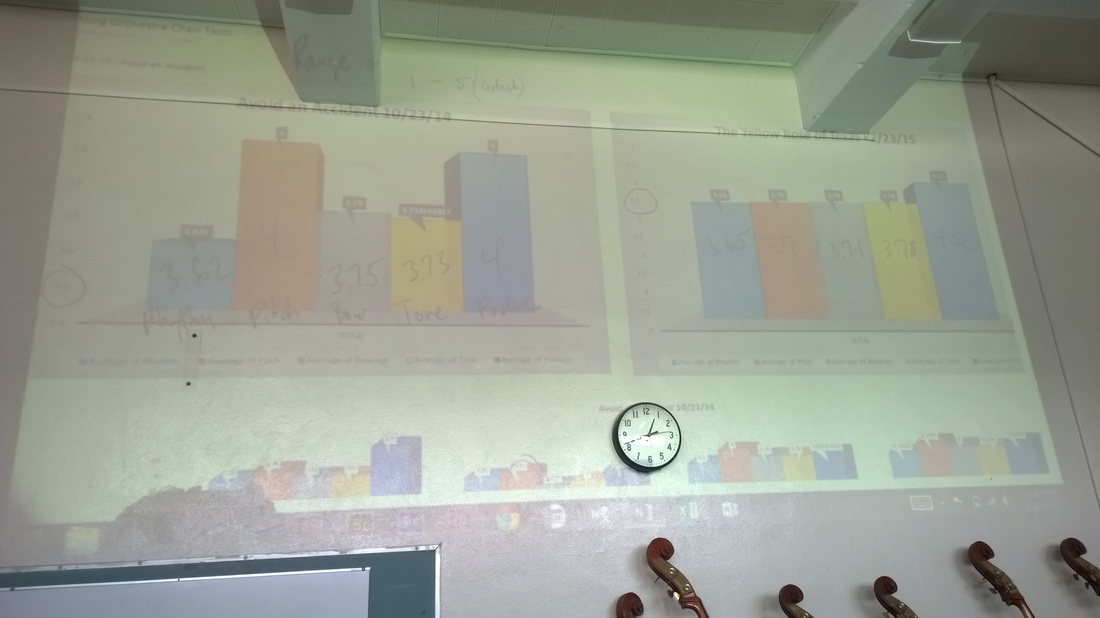
Fast forward a couple weeks. Instead of having each group get up and present in front of the class. I assigned the students to peer assess three of the other groups' slide decks. In order to get this done I needed to give the students viewing access to all the other groups' slide decks, and keep everything organized so there wouldn't be any tech hiccups. I first created a copy of each group's PowerPoint file and saved them in another folder in my OneDrive. I didn't want any last-minute-way-past-the-deadline-and-we-didn't-finish editing being done during the peer assessment process. I then navigated to the <iframe> embed code for each file and copypasta'd it into a separate Sway. I used Sway so I could also embed the Peer Assessment Form and the directions and keep everything centralized. Then I took all the viewing links to each Sway and put them in OneNote. I created a table so each student could find their group and then click on the corresponding link to get to the other group's  Sway project page. When the OneNote page, the Sways, and all the links were ready the students came in one day and started peer assessing their classmates' collaborative work. Their peer assessment scores were inputted into a Form, which of course I then uploaded into Power Bi so I could create a feedback chart to give back to the students afterwards.
Picture
Picture
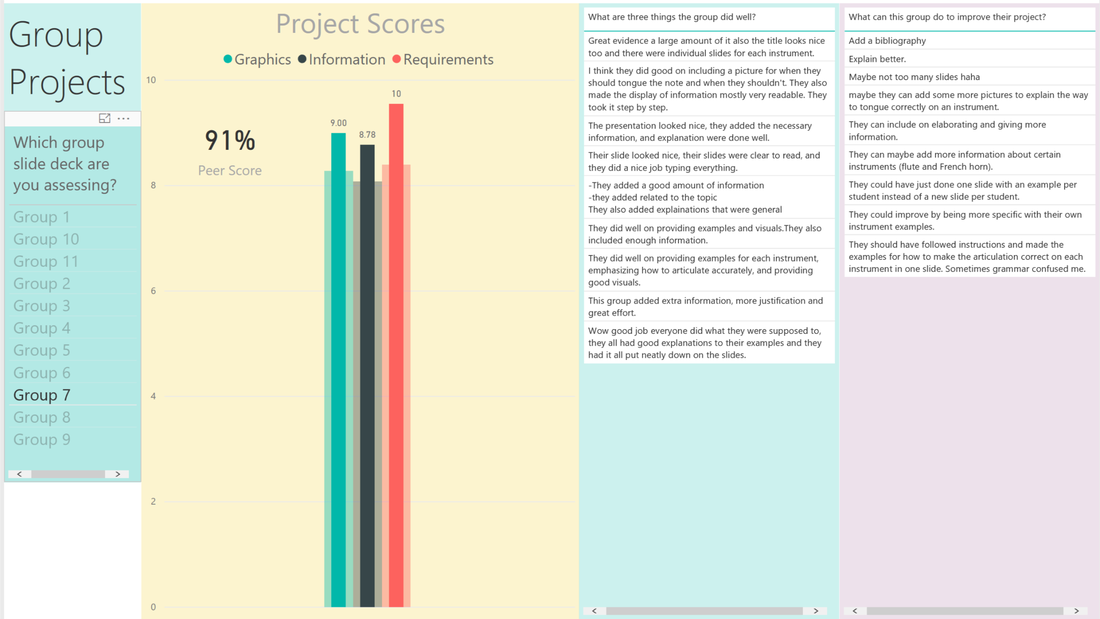
​This whole slow cook'n process took over a month. It was during #EdTech conference season, so my traveling to various conferences definitely slowed down the flow. Plus I was doing this for the first time, so I was creating all these new OneNote pages, Sways, Forms, PowerPoint files, and Power Bi charts as we went along. We also weren't working on this everyday. We were rehearsing, practicing, doing our theory, and other various classroom activities throughout the weeks. In the end my students had completed some data analysis, reflected on it, did research on how to become better at their particular performance technique deficiency that corresponded to their instrument, then collaboratively worked together to synthesize that info and create a slide deck that presented the relevant information. I enjoyed brainstorming and designing the process, and I enjoyed seeing their work. Most importantly my students were practicing the 21st Century skills they will need when they get into high school.
We still weren't done yet though. My students had reflected and researched on what they needed to improve upon, next they would have to put it into practice...
1 Comment

Data-Driven Interventions in the Music Classroom Part 3: Data Analysis & Reflection

8/17/2018

0 Comments

 
This is part 3 of a series of posts I'm writing on my past school year using various edtech tools for data-driven interventions.
Picture
Note: About midway through the school year, I decided to continue the next phase of this process with only one of my two advanced 7th/8th grade classes. Flipgrid assessments continued for both classes, but for various reasons I only continued the data-driven intervention activities with my band students.
Usually after Winter break, I spend time with my 7th/8th grade advanced students teaching them new music theory concepts, new performance techniques, new rhythms, etc. Along with the usual January lessons, it was time to act upon the performance assessment data I had been collecting and sharing back through Power Bi. In the previous school year I did a practice run of this kind of activity. Students did some analysis and wrote a reflective essay (gotta support that ELA CC!). However, this time around I decided to keep the reflection part, ditch the essay, and integrate more actionable activities for the students. Here is how we started.
Student Reflection on the Data

I created a reflection activity for my students. Basically just asking them a bunch of questions about what they saw in their personal data from the class Power Bi report. The goal was to incorporate math skills (chart/visual analysis, finding averages, comparisons), have them write using music academic vocabulary, citing primary sources, and of course some critical thinking, communication, and metacognition. The assignment was created and distributed in our OneNote Class Notebooks. During the design process for this activity, I used tables and colors to visually organize the areas where students would enter in their answers, and I embedded the Power Bi report right onto the page because that's how awesome OneNote and Office 365 can be. After the page was ready I distributed it out through the Class Notebook tools tab. Students were given a week to complete the assignment before I would start leaving feedback. On the first day I directed them to the assignment, explained it, answered questions, got them started, and then flipped my switch to facilitator mode for the rest of the class. For the rest of the week sometimes I would give them a little time at the end of class after we finished doing our daily music education stuff. Because of the awesomeness of Surface, OneNote, and digital ink, I was able to review and leave feedback late at night before bedtime. Some students got their math wrong, or didn't even understand what kind of math was required to find their average. Yikes(!), but whatever, I'm a teacher and this presented a teachable moment. Some of the questions at the bottom of the assignment that required critical thinking were challenging for the students, but I helped them out in person or with my OneNote feedback. Students were also allowed to revise and improve their work as much as they needed to.
Picture
Example of one of my student's reflection on the data. This was a really good one.
How do I improve?

After I was satisfied with their data analysis and reflection work, we moved onto the next step. Based on the numbers, what was their neediest performance technique? Was it Pitch, Rhythm, Articulations, or Tone? (Posture was excluded)
Picture
Same student as above
For this assignment they had to get online and do some research, looking for resources on how they could improve their particular performance technique for their instrument.  Note: Technically they had two separate neediest categories they were aware of, one from their peers and one from me. For this assignment they used their lowest scoring category according to my scores. I asked for a minimum of two sources (one video, one written), and they had to explain their value and cite where they were from. I left room for four sources and a lot of my students filled those up. Want to know another great feature of OneNote? When students posted the link to a YouTube video on their OneNote assignment page, the video automatically embeds itself. I was able to watch their source videos without ever leaving their assignment page 😊. I gave them a week to get this done.
 
Meanwhile...

Now, while they were busy getting their research done, I was doing a little organization on my end for the next phase in this process. In my non-public Power Bi file I created a table that displayed my students, their average performance scores (from me), with a little conditional formatting thrown in. Looking at this table I started jotting down my students names in OneNote, organizing them into groups based on their lowest/neediest performance category. I kept the groups to 4-5 students, and I mixed up the instrumentation as best I could. I kept my percussion kids together in a group, since their performance technique differs from the wind players, and I also tweaked the groups a little bit based on student behavior, separating my chatterboxes.
Picture
Check out those Tuba scores □
I ended up with 11 groups; one for Pitch, three for Rhythm, four for Articulations, and three for Tone. As my students were reflecting and researching, I had begun slow cook'n an Iron Chef activity for them, and soon we were about to dig in.
Part 4 begins the intervention phase of this whole big process, and is coming up next. Stay tuned as I present my experience of slow cooking an Iron Chef activity with my band students. 
0 Comments

Data-Driven Interventions in the Music classroom Part 1: Flipgrid FTW!

7/7/2018

1 Comment

 
This is part 1 of a series of posts I'm writing on my past school year using various edtech tools for data-driven interventions.
Picture
Capturing students' performance skills on their instrument is an important measurement for music teachers. When I observe a student perform, I can hear and see what they're doing well, and what they are struggling with. Their challenges can either be related to reading and interpreting music notation, or the kinesthetic aspect of playing their instrument. Playing with correct articulations, posture, bowings, and the minute details of their finger technique are all important to successfully performing on a musical instrument. As important as this is in music education, it is a time-consuming process to hear every student in an ensemble. This past school year my average class size hovered around 50 students. Unlike a written test, where students take an assessment at the same time, I have to listen to each student individually. Listening to each student perform an assessment during class takes at least 3 to 4 days, and can easily eat up a week of class instruction. It is important though, as it starts teaching my middle school students some practical life skills like responsibility, communication with their parents to schedule practice times in my classroom, how to deal with the anxiety of performing in front of peers, trying your best, and the idea of Practice makes Perfect.
Over the past decade or so, technology has been introduced to alleviate the time management challenge of listening to students individually. Using stationary video cameras to record students, sending/receiving video recordings though communication services like email, LMS, or the cloud, well designed (but expensive ☹) solutions like SmartMusic, and even submitting recordings directly through OneNote. All of these could work, but in their own little way were never the best solution for me. Then along came Flipgrid, and I found a tool that worked perfectly for my student performance assessments
Picture
Flipgrid took care of a lot of little issues I had with other technologies. It records video, providing me with both the audio and visual I want. It hosts and organizes the videos seamlessly, which at the time was such a huge feature for me. Teaching students how to record, save, and send a big video file (which is always dependent on their device and the communication service) is no longer a cumbersome task for the students and me, and I don't have to worry about saving and syncing a large amount of video files to the cloud and my computer. With Flipgrid, it's a breeze for my students to submit videos of themselves performing, and it's a breeze for me to access them. That was such a game changer. Flipgrid also makes the process fun for the students, giving them the ability to add graphics, digital ink, and all the buttons my students can click on to like each other’s videos. I'm not fun like that, just ask my students. Most importantly though, the listening-to-students-perform assessment process was moving out of my classroom instructional time. Student could now perform and submit their assessments videos before or after school in my room, or at home. 

Picture
First assignment using Flipgrid: Describe your instrument!
An intro video for one of my assignments
As I've written in previous blog posts, I incorporate peer assessment into my student performance assessment activities. I assess my students when they perform, and the students do too. We use a rubric and a form. It started out as a paper/pencil routine, but I've since moved the process to using an Office Form. It's more practical, and I get so much relevant data now from my students! This year had to be a little different though, because I was adopting Flipgrid into the workflow. Now I'm able to assign more assessments, but I can't have students still assessing the rest of the whole class (50 students!) using my assessment form. They would go nuts and hate me. I narrowed it down to three. Every time my students had a new performance assessment to submit though Flipgrid, they would only have to do three peer assessments.
Picture
Picture
A Flipgrid assignment page in our OneNote Class Notebooks
We use OneNote Class Notebooks, so organizing all the little parts of this activity was easy. Instead of sending my students off to various parts of the web to get the info they need, I bring it to them through OneNote. At the top of my OneNote assignment page were all the instructions, followed by the embedded Flipgrid topic for easy access. After that I included a graphic of the percussion music for the wind players. The percussion kids' music was different from the wind players, so the wind players assessing them needed to see the music they're assessing them on. Below that I embedded the Office Form the students would fill out for their peer assessments. I used the same Office Form for the entire school year, which I will explain later in another blog post. My students needed to know who they had to peer assess, so at the bottom of the OneNote page was a table for students to find their name and the other students whose Flipgrid videos they were assigned to assess. Setting up the table was easy using Excel. I downloaded my class roster into Excel and copy/pasted the list a few times moving students up and down each time there was a new assessment, copy/pasted the finished table into OneNote, and then gave it a splash of color. In the end, I had an assignment page with all the resources my students needed. This eliminated a lot of those "how do I…" and "where do I…" questions from my students.
I would drop hints to my students as to what their next assessment exercise would be (usually from our method book) during class, but when the hammer officially dropped, I gave them a full week to submit their Flipgrid recording. Flipgrid can automatically close topic submissions, and I started using that method. I opened submissions again for the students that missed the deadline. Not a problem, they'll just lose a couple points. Speaking of points and grading, these were 10-point assignments. You either submitted your video on time (10 points), late (8 points), didn't submit at all (0 Points). That was it. I was using a point-based rubric to assess and score their performance, but that number never made it into the gradebook because I never intended it to. Those numbers was for something later 😉 Same deal for their peer assessment submissions. Ten points for 3 peer assessments, and then losing some points for each assessment not submitted. This took a lot of the anxiety my students have off of the performance aspect of the assignment. My students just had to submit their video and do 3 peer assessments to get full credit. Easy peasy.
Picture
Students hanging out and practicing for Flipgrid assignments. Clarification: The boy holding the violin incorrectly plays the trombone
It worked, and it worked really well. I was able to listen, watch, and assess my students more frequently throughout the year, and was able to space the assessments in-between concerts, concert rehearsals, semester projects, and honor ensemble activities. My students were checking out their instruments more to practice, and the couple days before a video recording was due my room was so packed with students practicing/submitting, they overflowed outside the classroom. As a music teacher, it was a incredible sight to see and experience 🙂 The students were engaged with their peers, helping each other with their music, showing lots of encouragement, holding each other accountable for their submissions, and pressing all those like buttons in Flipgrid. I even had a former cello student (now in high school) sneak his way onto the Orchestra grid and submit his own videos. That is just plain awesome. Who wouldn't love that happening.

A former student sneaked his way onto a grid topic and decided to add his own embellishments to the exercise 😁

Posted with his permission
Transforming this assessment routine with Flipgrid was just one part of the bigger picture. By doing these activities I was now receiving lots of assessment data from my students and myself. Data that could be used to track growth and progress, but also to find more interesting insights by comparing assessment scores between teacher/student, instrument sections, grade levels, before/after interventions, and more. How I was able to organize, manage, analyze, and share that data will in the next part of this series.
1 Comment

Data-Driven Interventions in the Music Classroom

7/6/2018

1 Comment

 
For a few years now I've been messing around with Power Bi, using it more and more with my students and myself as I learned how to use the program.  This year I integrated it even more into my pedagogy with my two advanced classes, made up of 7th and 8th grade students, to track their performance skills and more as it turned out. This past school year I've travelled to several Educational Technology conferences presenting on this recent work, and I get a lot of questions like "how I created and made everything work" and "how I came up with the idea." It's a long story, and is based on the edtech I use and more importantly music education pedagogy. It can't be explained in a single blog post, so my plan is to write a series of blog posts that covers what I've done.
Picture
Now, if you're looking at the graphic you're probably thinking this is nothing new, I do this workflow all the time in my classroom. Probably using some form of Formative Assessment. Good! You should be! My story will cover how I integrated the above set of technology tools to create activities that incorporate the 4Cs, student centered learning, a little bit of metacognition, data, and probably some more Edu buzz words.

The activities I'll be writing about spanned the course of this past school year. In fact, in my opinion I didn't even really finish the whole process. However, I feel it was a pretty good first run that can be expanded upon next school year. The cool thing is some of this data will carry over to next year, since I'll be seeing my 7th graders return as 8th grade members of my ensembles.

Stick around for Part 1
1 Comment

Takeaways from #CUE18

3/25/2018

0 Comments

 
Picture
#MIEExpert Meetup at CUE 18!
It's been a week since CUE 2018. The conference was a nice break from the classroom. It's not that I don't enjoy teaching my students ( I do), but getting away allows me to reflect on the current state of #edtech and brainstorm on how to use up & coming useful technologies. Usually this time is reserved for late at night, but lately I find myself choosing sleep more often than not. Anyways, the point is I get some distraction-free thinking time. Here are some thoughts:
Picture
My partner in crime @TammyDunbar
Picture
My roomie @IceManTruck!
#OneNoteEdu - Tammy Dunbar and I gave a 3 hour Office 365 workshop, and I put together the section on OneNote. I've come to the conclusion that there is never enough time to discuss OneNote. There is just too much to talk about. Attendees need to understand the organizational structure of a OneNote notebook and the power of the page. Immersive Reader, embeds, math, tables, ink, researcher, printing and sharing, and then there are all the basics too. And if that wasn't enough, Classroom Notebooks take it all to a new level of pedagogical thinking, planning, and designing. I showed off a lot of examples of how I'm using Class Notebooks to share content, organize everything digital in my classroom, and implement learning activities with my students. It's pretty crazy how one software program can be used in so many various ways, be it for independent or collaborative student learning. At the same time, since OneNote is my classroom hub for practically everything, I don't have to teach new routines for other apps or online services. When my students come into the classroom and see that they're using iPads, they don't ask "what do we do?", they just automatically open OneNote, log in, and open our Class Notebook. I like this. It saves me time.
Picture
I like to have a coffee cup and surface pen in my hand while I'm presenting □
I digress though. Explaining all the ins and outs of a Class Notebook is also a big challenge. There is distributing and reviewing work, LMS integration, creating collaborative sections, creating groups for differentiated page distribution, the process of setting up a Class Notebook, and the permission levels associated with the three main sections. It's a lot to digest in such a short amount of time, and it's a lot to try to explain in such a short time too.
Picture
Explaining my assessment designs to the audience. Thank you Tammy for all these pictures!
Power Bi - I gave my Power Bi session again. This was my third time, and I still haven't figured out a cool catchy name for my session title yet. I had a bigger audience this time. My session resource link (available at the session) was pinged 91 times that day (yay!). Maybe this whole what-are-we-going-to-do-with-all-this-student-data-and-how-are-we-going-to-manage-it idea is starting to catch on. It also helped to have a good location for the session as well 😉 Lots of people were interested, and there was a collective "wow" when I demonstrated manipulating a chart on students' success rate with multiple ELA anchor standards to show me the data based by grade level, class section, and both. I received some complements for my session at the end, before everyone was rudely kicked out by the convention staff.
Picture
Because it matters
Picture
Tammy has the best pics and captions
FONBME - This is a take on FOMO (Fear of Missing Out). I call this Fear of Not Branding Myself Enough. There is just so much of it going on, and I don't know how to react to it. Should I do it too? I imagine it's time consuming, having to create a fancy acronym, write blog posts for every little thought, and having to attach myself to Twitter more than ever. I'd rather spend time this time with my family and on my students' learning. I like to create, innovate, and problem solve. This takes time. Time away from branding I guess. Oh well.
Picture
First time on the Vive. I heard it is one of the better headsets available. I agree.
AR & VR - CUE has a nice little virtual reality playground for attendees to play around the latest devices (except for Microsoft's mixed reality headsets 😕). I'm still trying to put my finger on this for the music classroom. Yes, there are use cases for the historical part of music education, but I'm still trying to figure out how AR/VR could be used to help students understand and grasp the basic music concepts I teach in middle school. I already accomplish this without AR/VR, but does it have something to offer that makes it pedagogically worthwhile? I still don't know. Honestly I don't have a device to play around with and test, but that's not the real issue. I know what works in my classroom. I know how to design my resources and activities so that my students learn in my classroom. I want to (try to) do the same with VR. I want to be able to create a VR experience tailored exactly the way I want it for my students (TPK and TCK), except I don't know how to design for VR yet. During a discussion I had with one of the VR experts, I did learn about WebVR though, which I'm told is where everything is headed. Imagine if teachers had easy tools to create worthwhile VR/AR experiences for their students that could incorporate permission levels from the cloud, like a VR/AR classroom that adapts for every student. That would be cool. Make it happen Microsoft.
Picture
Alas....no more ☹
0 Comments

recent guest Blog Posts

3/1/2016

0 Comments

 
Recently I guest blogged on a couple of websites. I wrote one on how the StaffPad app has been changing my pedagogy in the music classroom. You can find it over at the Daily Adventures blog.

​I also wrote one on how using a Surface in my classroom has transformed my instructional practices, and is a seriously awesome machine for the classroom. It's actually over on the Surface Blog, and....there's a video :-)

​So my classroom was filmed for a couple days to make the video. My students really enjoyed it, and it was a great opportunity for me to explain some of the ins and outs of the film industry to them. They were pretty psyched too when they saw the final product months after the initial filming. 

​Check it out
0 Comments

Ready, Set, Office! Developing new Pedagogies with the Power of Microsoft Office - Part 2

4/2/2015

1 Comment

 
In my last blog post I presented how I was able to create new resources to transform a regular music class routine (chair test) into a more meaningful activity for my students. Besides performing the required music excerpt for their test, they were also engaged in the analysis and evaluation of their peers as well. Not only does this support our school wide tier 2 academic vocabulary words, but also requires my students to listen and evaluate using musical tier 3 academic vocabulary concepts such as Tone, Pitch, Rhythm, etc.
Academic vocabulary (AV) is the vehicle for our school wide project. We measure its usage within our assignments to compare and hopefully find instances of positive deviance within our instructional practices. This has required me to get creative and develop new forms of assessment to measure my students use of AV in their academic writing. Whereas this kind of activity is common in the core subjects, it's not quite the typical activity found within the instrumental music class. My students have already completed one writing assessment this year, and I recently had to come up with a new assessment, different from the first, to measure my students' AV use.
My students recently completed another chair test, and I found myself looking at two sets of data points. The scores from their first chair test, and the scores from the recent chair test. The scores are based on a rubric I previously created, which accounts for the correct Pitch, Rhythm, Tone, Bowings, and Posture of their performance. The data is great for me to analyze, but what would my students think after seeing it too? I decided to find out. 
Picture
Data on the Mega OneNote Whiteboard
Within the Excel file containing all my score data, I exported the numbers from both chair tests into two separate pivot tables. Using the pivot tables, I was able to average the rubric's category scores and show how my students' performed as a class and also as a section. 
After my pivot tables were set up, I turned the data into charts with a couple of mouse clicks. I formatted the chart to make it look nice and simple for my students. After the charts were done, I exported (copy/paste) them to a Word doc, typed up the assignment directions, and Voilà! A new writing assignment. My students had to compare both sets of scores and look for changes among the rubric categories. Then they had to analyze both chair test exercises and use them to explain the changes that occurred in their score averages. 
Seeing the differences in their scores was a pretty easy task, but explaining the changes by analyzing and citing specific challenges that each song presented…that was going to be a challenge for them >:-)
Picture
The first chair test exercise
Picture
The second chair test exercise
I gave them two days, and overall was pleased with the results of my students first attempt at this. Citing the data was not an issue, and most of them were able to dig a little deeper into the music and specifically identify and compare the technical challenges from both songs. Pretty cool. I love making my students think :-)

Below are some examples of what I received in their essays. Some are exactly what I'm looking for, and some are just fun to read :-) 

Scroll to the right --->
I've been collecting this data for years, and by using Excel's pivot tables I was able to create a meaningful writing assignment for my students. An assignment requiring the analysis of music and data, plus synthesizing and justifying their findings into a written essay.
1 Comment

Ready, Set, Office! Developing new Pedagogy with the Power of Microsoft Office - Part 1

3/15/2015

17 Comments

 
At my school site I'm involved with a group of teachers that are currently  looking for instructional positive deviances in our classrooms through research and data. We decided as a group to focus on building our students' use of academic vocabulary. Currently we're  analyzing the student use of vocab within our content areas, as well as focusing campus wide on 10 specific words. This has been a challenge for me. In the past my curriculum focused on building my students' reading skills of western music notation, not the English language. For me to participate effectively in the project, I was going to have to modify the activities of my music classroom. 
Picture
Our school-wide 10 vocab words, displayed on a bulletin board in a hallway. Kudos to the teacher that put this up.
Thanks to our meetings, where I get to listen to my colleagues (ELA!) discuss their processes for teaching and assessing academic vocabulary, I've been able to brainstorm and implement some new activities into my curriculum. However, to implement I would need new materials and resources that I didn't have. Instead of spending hours scouring the internet for the right tool/resource for my ideas, I've been able to easily create what I need thanks to the power of Microsoft Office and my Surface Pro 3.

The Meetings

I had a conversation with my meeting facilitator the other day. She told me that even though it looks like I'm not paying attention and participating in the discussions sometimes, she can tell the wheels are turning inside my head. She's right. As I listen to my colleagues, I'm writing down my mental musings into OneNote. These notes, which are readily available on any device I'm using thanks to the cloud, is where the creative process starts. The best part! No paper is required! As a teacher, paper is EVERYWHERE. Flyers, handouts, meeting agendas, new instructional materials, student work, advertisements. Using OneNote, my notes NEVER get lost ;-)

Picture
Meeting notes via OneNote & Surface & the Pen

Creating New Instructional Materials

Now that I have a plan, I need the materials to support that plan. Maybe it because I'm just particular, but if I'm going to use materials/resources to aid my new ideas, I'm going to make them myself. Using MS Office its Cake and Pie (piece of cake, easy as pie) ;-)

Listening Analysis Worksheet for Chair Tests

Chair tests are just plain fun….for the music teacher :-) For those unaware, in the music class we designate an exercise or musical passage to be used as an assessment test for the students. The students play the exercise/section one at a time in class. Based on the results of each students performance, they'll be seated in a particular order ie. first chair, second chair, third chair,…….last chair(!) within their instrument section. Its nerve-racking for the students, but great for me to experience (it also leads to great conversations about presentation skills, nerves, and overcoming them).  Anyways, I digress. Usually during a chair test, the other students just listen and wait for their turn. Well not anymore! Now, just like me, I want my students to listen, analyze, and give their own score for each student that plays. To do this, they would need a score sheet AND a rubric to score them with, which means I have to create one. Ready, Set, Office!

The Score Sheet

This one's pretty easy.
  • Download an Excel copy of the class roster from the LMS to get a list of names. 
  • Delete the extraneous stuff and tweak the file to include the score categories and a total score section.
  • Copy and paste into MS Publisher (included with Office)
  • Re-size if necessary and add some color.
Picture
The scoring section of the form. The bottom section is used for another activity and is discussed in Part 2.

The Rubric

  • Create a table in MS Word. Mine was a 6 by 6.
  • As text is added to the table, resize the table to make it look nice. You can:
                    - Click and drag the edges of the table
                    - Highlight the table cells, and use the Layout and Design tabs at the top of MS Word
  • Add some color, and copy/paste into MS Publisher
Picture
Creating my listening rubric in MS Word. Students use this as they listen to each other's chair test performances.

The Final Product

  • My Publisher file is composed of two separate pages. 
  • To add another page, Click Insert --> Page --> New page
  • I tweaked/re-sized the contents, make sure the colors will work, and added some other parts to it as well, such as name, period, etc.
  • The group members section of the form is used later for another activity.
Picture
Both pages are finalize in MS Publisher and saved as one PDF document.
That's it! I save the file as a PDF so it's shareable and can easily print off of a thumb drive.

My students use the form now whenever they have chair tests. I use the original Excel file I created to enter their scores. Using the formula functionality within Excel, their scores are automatically added up to give me a final score. When the testing process is done, I can easily sort the data by Score and Instrument to see the new chair rankings. I also copy/paste the results onto my mega OneNote classroom whiteboard, so the students can visually see the rankings themselves. 
Picture
A student scoring while they are listening
Picture
Me scoring the kids onto my MS Excel sheet using a Surface Pro 3. The Surface allows me to roam around the room to get better viewing angles of their posture as they perform.
Chair tests can take a while for all the students to complete, especially when there are 40+ nervous children in one class. Having them complete the score sheet helps with classroom management, fulfills the listening, evaluating, and analysis standards of music education, using school-wide and classroom vocab words in context, and also sets my students up for the next activity associated with their chair tests.

Stay tuned for part 2 which describes the next step of measuring my students' use of academic vocabulary! In the meantime, leave a comment :-)


Disclaimer: I am the proud owner of a Surface Pro 1, however the fine folks at the Cerritos Microsoft Store have been kind enough to loan me a Pro 3 to use. It has been wonderful using it, and I thank them greatly!
17 Comments

Teachable Moments with OneNote & Office Lens

2/15/2015

2 Comments

 
My String Orchestra class didn't go exactly as planned this week, and it's all OneNote's fault. On Tuesday we were supposed to continue in our method book, working on playing in the key of F Major. We were going to get to the next page and play one of my favorite songs, Waltzing Matilda! Alas, it did not happen thanks to that cape-wearing purple program called OneNote, and her little sidekick Office Lens.

It started when a couple of my violins came into class, talking about their new roles in the school play. They play the "music kids" and have to perform a song on stage during the performance. They handed me a copy of the song, and a conversation started. "The song is way too easy" was heard, as well as "what are those letters on top of the notes?" 

Boom! That was it. That was all I needed. "Lesson's over kids, it's time for a teachable moment!"   <-- I didn't actually say that ;-)

My 8th graders received a heavy dose of music theory instruction last year from me, and what a better way to start off this year's new theory season than with:

1) A review of last year's theory instruction.
2) Opportunities for critical thinking and application.
3) The creation of a new assignment/project for my students.
Picture
The song. It looks easy, so can we do more with it?
It took me less than 60 seconds to set it up. I pulled out my Lumia phone and snapped a picture of the song my violin student had in her hand using the Office Lens app. Two things then automatically happened behind the scenes. Office Lens saved that picture straight to my OneNote notebook on my Surface Pro 3, and it saved the picture as a PDF file into a designated folder in my OneDrive. Within 60 seconds of snapping the picture, I have the song plus some music staff paper up on my whiteboard-wall using OneNote. Then the magic started. 

I tackled the letters first, explaining how they represented Major and minor chords that went with the melody. I could tell some of my 8th graders were a little rusty, so we reviewed intervals and triads, which was fine since it helped with explaining the A7 chord. After that we tore up the song, analyzing every bit that the class time allowed. By the end of class, my OneNote page looked like this:
Picture
Song analysis made easy :-)
Picture
My classroom OneNote whiteboard
By the end of class, my two violin actors & the rest of the class received a new challenge from me. "If the original melody is to easy and boring for you to play, then write a harmony line to accompany it! Every bit of information needed to write one is already listed on the page." I offered extra credit for trying, and the coveted "Student of the Month" award for the best arrangement. My challenge was accepted :-)

The teachable moment was great. My 8th graders applied knowledge they had previously learned, I was able to introduce some new concepts, and my 7th graders were involved. This couldn't have happened without the help of my daily tech tools:

Picture
Working on my Master's Project at Compania in South Gate
Surface Pro 3 - I love this machine! I project my screen onto my classroom wall by wirelessly connecting my Surface to the projector with its built-in Miracast functionality. This enables all my students to see my "whiteboard" aka computer screen. It also allows me to freely walk around my room with my Surface, enabling me to use my proximity for classroom management purposes, engagement with particular students, and to use my classroom piano for reference, all without losing immediate access to my whiteboard. Using the pen and OneNote as my classroom whiteboard, I have unlimited whiteboard space and can annotate on PDF documents and pictures. The best part is when I hand my Surface and its pen to students and give them tasks to complete. The "Wow!" factor sets in and my students are completely engaged. 
Picture
Just another lesson using OneNote :-)
OneNote - ….is awesome because of how adaptable it is to various educational situations and settings.    In my classroom, it's my whiteboard, my overhead projector, my document camera, and my lesson planner, all nicely packed into one sleek program. I'm not limited by space constraints, I don’t need messy markers that always get lost, and I don't need to worry about poorly lit documents. OneNote has become the visual canvas of my classroom instruction. 
Picture
Screenshot of Office Lens in action
Office Lens - OneNote's little sidekick is a must for OneNote users. It's ability to capture images and save immediately into OneNote is simple, easy, and quick. For example, I use it to capture and display student's classwork for reference, analysis, and immediate formative assessment. The process is fast and seamless, and is great for those "teachable moments." Office Lens' continued development has introduced some great features lately. Not only can I quickly save an image of something to OneNote, but Office Lens will also translate the image and save as a Word doc, PowerPoint slide, or PDF file. This is great if I want to save, edit and use a document I receive at a meeting or conference. 

This trio of software and hardware has changed my daily pedagogical routines. I'm able to present more material to my students quickly in an effortless manner. As a teacher, I experience the "teachable moments" every day I go to work. Now, using OneNote, Office Lens, and my Surface Pro 3, I can easily turn a teachable moment into a visual interactive lesson for my students. 
Disclaimer: I am the proud owner of a Surface Pro 1, however the fine folks at the Cerritos Microsoft Store have been kind enough to loan me a Pro 3 to use. It has been wonderful using it, and I thank them greatly!
2 Comments

How OneNote is changing my pedagogical instruction, Part 2

12/24/2014

2 Comments

 
Over time, the information I've been required to post on my classroom whiteboard has evolved from a Learning Objective, to the Learning Objective + Classwork and Homework agenda, to a Learning Target (students will Know X and Understand Y by Doing Z) + the Classwork and Homework agenda. It's a lot of information. Don't get me wrong, it's totally appropriate and necessary for students' learning, but there's an issue. I teach five completely different classes, so  getting all that information on display for all the students is a challenge. I have a few options for displaying information on my un-centered, small, single whiteboard.

1) Write the learning targets and agendas for every class on the board. Drawbacks: Tiny writing, students can't see what I've written, no blank space on the board to use during instruction.

2) Only display one class at a time. Drawbacks: Some students still can't see, writing for every class is keeping me from supervising/managing my incoming and outgoing students during the passing period. Remember, I'm dealing with expensive instruments, cases, chairs, and music stands.

3) Install some more whiteboards in my room. Tried that, district took them down :-(

4) Give up and just not write it on the board.  <--Not an option!
OneNote is awesomeUsing OneNote to display my daily agenda
Over the years I would bounce around between option 1 and 2. Students from one side of the classroom would have to get out of their seat and walk over so they could copy down the agenda in their planner. One year I did install some cheap office-store whiteboards, but those eventually disappeared from my wall courtesy of the district maintenance crew. It wasn't until I discovered OneNote on my Surface Pro that I finally found a solution. At the time, I was connecting my Surface to my classroom projector to display instructional content, and began to use OneNote at school to take notes at my work meetings. OneNote's organizational structure (Notebooks -> Sections -> Pages) makes it incredibly easy to create and stay organized. I quickly figured out that within my "Work" notebook I could create and designate a section for each of my classes. Within each class section, I could create and use a page for each daily agenda and learning target of the day. Boom! Now instead of using my not-so-strategically-placed-in-the-classroom whiteboard, I just connect my Surface Pro to the strategically-placed classroom projector, open OneNote, go to the relevant class page, and viola! Now all my students can see the classwork, homework, and learning target for the day. Switching between each class agenda takes seconds, giving me back the time I need to monitor the students coming and going, setting up, and needing my assistance.

Creating a new agenda is super easy. OneNote automatically provides the date and time for when a page is created, which helps me keep track of the day and plan the information to be posted for my students. Just like in MS word, I'm able to create tables within OneNote's whitespace.  I use the table function to format my agenda info for easy reading and understanding. I never delete my agenda pages, and here's why. By scrolling through the previously created class pages, I'm able to quickly check the agendas from past school days. This helps me stay on top of what we're learning, what's been assigned, what I'm collecting, and what's due soon. Using the keyboard shortcuts Ctrl-A (select all), Ctrl-C (copy), and Ctrl-P (paste), I can quickly create a new daily agenda and learning target page with a consistent style and format in a matter of seconds. This new method and routine is much faster and easier than writing it in a lesson plan book, and then again on my semi-useful classroom whiteboard. I also don't have to worry about students being unable to read my handwriting as well ;-)

In my music room, my Surface Pro is continuously connected to my classroom projector wirelessly via its built-in Miracast wireless display connection. Now I can be standing at my classroom door with my Surface, not only monitoring my students, but also changing the agenda for my next class. Using OneNote makes the task fast and simple, and it keeps me organized(!).


But wait, there's more!
I now have a second classroom on the other side of campus where I teach my multimedia students. The room is a generic computer lab for teachers to sign up and use, so I don't personalize it or leave any equipment there. Does that stop me from using OneNote to show the daily agenda? Nope! All my OneNote notebooks are available for me online, so I can get to them from any internet connected device. The computer lab's projector is connected to a generic teacher workstation, which either mirrors or extends it display. Using the computer's web browser, all I have to do is:
1) Login to Office.com
2) Click on the OneNote icon
3) Open my Work notebook
4) Click on the class
5) Click on the page showing the daily agenda
6) Done!
PictureIn another classroom? Not a problem!
I can even make edits from my Surface Pro, which then immediately reflect on the projector screen. The edits are synced in real time to the cloud version of OneNote (the browser version I use to display the agenda in the computer class), and the edits take merely seconds to reflect on the teacher workstation.

OneNote is free to download, and can be installed on practically every device that you can connect to a projector.  Teacher workstation, check! iPad, check! iPhone, check! Windows phone, check! Android tablet/phone, check! Thanks to my Miracast dongle, I can even use my Nokia 1520 to wirelessly connect and display the agenda if I need to. Using OneNote combined with my Surface Pro solved an issue I've been dealing with for years. It's incredibly simple, and enabled me to be a much more effective and organized teacher for my students.
2 Comments
    About Me 🙂

    RSS Feed

    Tweets by @AndrewNRoxanna

    Categories

    All
    CSULB
    ETEC 551
    Flipgrid
    #MIEexpert
    Mieexpert15
    MS Office
    Office 365
    Office Lens
    OneNote
    PowerApps
    Power Bi
    Surface Pro

Proudly powered by Weebly